What Can Go Wrong, Will Eventually Go Wrong! Back-up in The Hotel.
You had a busy day shooting great pictures and have arrived at the hotel. How do you treat your photos to make sure you don’t lose them? This is the second part in a three part series on how to back-up your photos at different steps in the life cycle of your images.
The first part was focusing on backing-up photos in the field while you shoot. This second part is an optional step, in case you are on a multi-day trip and are not back home in the evening, but instead in a hotel. The final part will address how to backup back at home.
Again, as the title says, “what can go wrong, will eventually go wrong” and there is a good chance that one day you lose pictures, if you are not careful.
Back-up Your Images In the Hotel
Back in the hotel, your images need to move from the memory cards to another location. I am assuming here, that you have a Laptop. You will need at least two different disks to back-up your images properly.
Use Your Laptop with External Disks
I recommend to buy two external disks for your laptop, which you can connect via USB. Ideally, those external drives are SSD disks. SSD disks are not only faster, but are much more resistant and have no issues if a disk e.g. drops to the floor. With classic disk drives with rotating disks, a drive can be damaged, if it drops.
Backing-up to Disk One (Primary Storage)
You connect disk one and copy all images of this days shoot onto disk one. As this is my primary storage of the images, from where I will also import them into my Lightroom catalog I am using while on the road, I store the images in the same directory structure I want to have for my catalog directory structure.
If you used several cards throughout the day, repeat the exercise for your other cards.
Verifying the Back-up in Lightroom
Browsing through the images with a picture viewer program will give you a good indication that the images are intact.
Best case, you import those images into your Lightroom catalog and create Preview Images during the import process. If that all goes well, the integrity of your images is proven, your first back-up is fine.
Backing-up to Disk Two (Primary Backup)
Once you have verified the integrity of your images, you connect your second disk to your Laptop and make a second copy of the images there. I recommend to create a directory for each memory card you back-up. Let’s call the main directory back-up. For each memory card you back-up, you create a new sub directory in your back-up directory. Let’s name them [DATE]-Card01, [DATE]-Card02, etc. DATE will be replaced by something like YYYY-MM-DD (e.g. 2018-09-05).
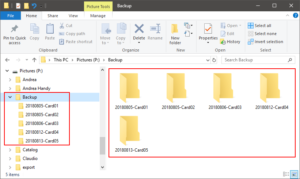
You never touch the files on this disk. You don’t add them to your Lightroom catalog, you don’t delete the bad pictures. This is really your primary back-up, where all images are backed-up to. In the best case, you never have to go back to those files. However, what you should do is browse through and check that at least the thumbnails show correctly, to make sure the images are not corrupt.
If you have enough memory cards, don’t delete the images from your back-up memory cards. Ideally, the images on the back-up memory cards remain there as the secondary back-up. This will give you three copies of your images. The images from your primary memory card can now be deleted and the card is ready for the next day. Once you are back home and have backed-up all your images at home, you can then delete the back-up memory cards.
Mobile Memory Card Backup as Alternative to External Disk
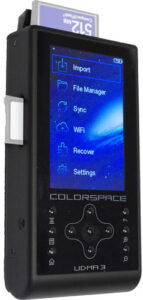
There are some dedicated mobile devices, that allow you to make a back-up of your memory cards without a computer. Those devices run on batteries, so they can even be used in the field. Those devices have a hard disk or SSD and often a little screen.
You just put the memory card into the device, press back-up and it copies the pictures from the card to the device.
Via the little screen you can usually even look at the images.
Those devices don’t come cheap. If you are a Sony or a Nikon shooter, you may also have the issue that such devices sometimes don’t take XQD cards. But if you have such a device that supports your memory cards, they are really handy. I have a Colorspace UDMA 2, which supports SD cards and I really love it. There are different devices on the market, but not too many. Here some examples I have found are the Sanho HyperDrive UDMA3, the Nexto DI and the Xfermax x8 (not sure where to buy this one though). The latest product in that area and probably the most popular is the Gnarbox.

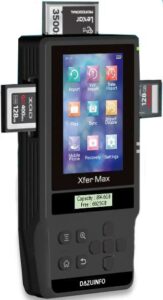
So when I am on the road, instead of working with two external Laptop disks, I use an external SSD disk as my primary storage and the HyperDrive UDMA 2 as my primary back-up drive.
Backing-up to the Cloud from On the Road
In an ideal world, we would now make a back-up to a cloud solution, to a) have three back-ups of our images and b) have one back-up in a different location.
I often don’t do this for a very simple reason. Wireless LAN’s in hotels are usually really slow. Uploading large amounts of images into the cloud via the hotel WLAN is therefore very often not an option. Even worse if you are on a campground. Hence why I don’t even bother.
Keep Your Two Back-up Disks Separate
For the very reason that a cloud back-up usually is not possible, I make sure that I have the two disks always separate from each other, when I leave the hotel room. Ideally, you leave one disk in the room (best placed in the save) and you take the second disk with you.
If someone breaks in to your hotel room, you will therefore only lose one copy of the images at worst, but not both copies of the images.
Also when I travel by plane, I will always put one disk into one of my checked-in bags and the second disk will go into my hand-baggage.
Recent Comments